Natural Blur Photo Manipulation basic For Beginners in Photoshop CC
How to change with Professional Blur Background with matching color. Natural Blur Photo Manipulation for Beginners in Photoshop CC, and add fantasy soft light effects in Photoshop CC.
This tutorial I will go to show on how to Change with Professional Blur Backgroud and how to matching color With Background. So let's Get Started.
How to Natural Blur Photo Manipulation Step by Step?
Step 1:
At First Open Your Photoshop then open your image. Select the pen tool and select your image. After fully selected then mouse Right-click and Make a selection.Select another Selection area and Hold Press Control Shift-Enter. Now press ALT+CTRL+R for Refine Edge. Here select to Onion Skin. and select refine the tool and select your hair outside the area.
in this refine edge dialogue box make sure to Output to New Layer and click on checkbox Remember settings. then ok.
Step 2:
Now take your Blur Background image. Select your Subject layer and Press CTRL+J for layer copy. Then selected this copy layer and go to filter then noise then reduce noise.Here select to strength 10 preserve detail 0 reduce color noise 0 and Sharpen detail 20. and also go to filter then blur then surface blur. Now hold alter the key and click on the mask. And select foreground color is the white and select brush tool. and now use it on your face.
Step 3:
Now hold the control key and select your 2 subject layers and press CTRL+E for layer marge. Now select this layer and go to filter then camera raw filter. Here increases and decreases just something as your desire. Now ok.Step 4:
Now select your background layer and use color lookup. Select your color lookup filter and must be opacity decreases low. Select this layer and use gradient. Then Select your gradient fill and from Blending mode select to soft light. and must be opacity decreases low.Step 5:
Now create a new layer for soft light effects. Now take your other tree image. Then select the layer and create a mask. and must be select foreground color is the black and select brush tool. and must decrease your opacity and flow. Now take the sunlight effect. Go to filter then blur then Gaussian blur. select from blend mode to Screen.Step 6:
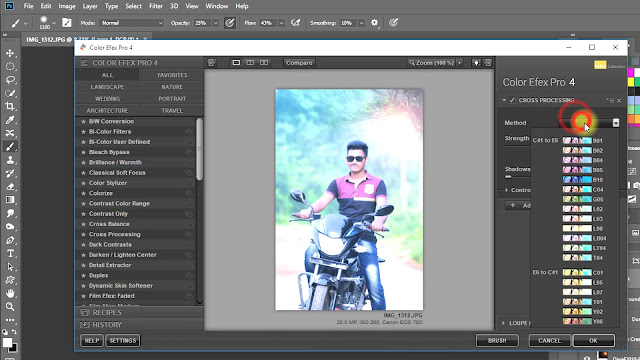
Now Select your top of the layer and Hold Press ALT+CTRL+SHIFT+E for the Apply current image. Now select this top layer and Go to filter then Nik Collection then select color Efex pro 4.Here select to cross-processing Filter and select your desired filter for more fantasy color. Click on Add filter. and use another filter. Select Darken and Lighten center filter. Now Click on Ok. This time you can save this image.
Working Screenshots Below:


Thanks for Watching My full tutorial. I hope you Must LikeThis Tutorial. Please Like comment and Please Share My videos. Thank you so much for stay with me. see The next tutorial. Thank You!
Blur Photo Background and Green Effects
How to Replace Blue SKY Quickly in Adobe Photoshop
See Another Related Post:
How to Outdoor Portrait Blur Background Photo EditingBlur Photo Background and Green Effects
How to Replace Blue SKY Quickly in Adobe Photoshop

Hello! I know this is kind of off topic
ReplyDeletebut I was wondering if you knew where I could get a captcha plugin for my comment
form? I'm using the same blog platform as yours and I'm having difficulty
finding one? Thanks a lot!
Post a Comment