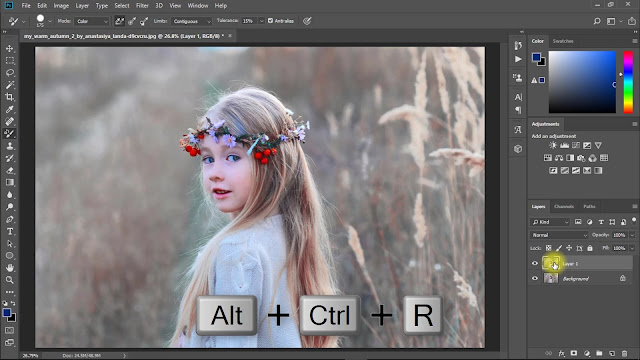
How to blur the background in photoshop, how to fake depth of field in photoshop, blur background photoshop, photoshop, how to blur the background in photoshop cc. how to blur the background in photoshop cs6, photoshop tutorial, how to create depth of field in photoshop, blur the background in photoshop, shallow depth of field, blur background, depth of field in photoshop, photoshop blur background.
How to Depth Of Field in Photoshop?
This tutorial I will go to show on Best Tricks to make perfect Blur background and create realistic bokeh overlays with perfectly cut out hair in Photoshop. So let's get started.
Step 1:
At first, open your photoshop then open your image.select your background and press control J for layer copy. Now press ALT+CTRL+R. here select to overlay and select a quick selection tool. and select your image area.
Step 2:
If there is any mistake for selection, so just select subtract selection and easily select your image. This time select refine edge brush tool. and select your image outside the area for realistic selection.Step 3:
then output select to a new layer with a layer mask. then click on OK.now rename this second layer to Blur background. Selected this layer and select the spot healing brush tool. and easily carefully drag on your image.
Step 4:
On your subject layer. convert to smart object your blur background layer. now go to filter then blur gallery then tilt-shift. hold and drag to the bottom. here increases blur level. and increases light bokeh and bokeh color. And must be decreases light range. then click on ok.Step 5:
If you want to again change anything, just double click on the blur gallery. and you can again change. Now want to perfect cut out hair. so select your original background and press CTRL+J for the duplicate layer. Rename this layer to hair details. and must be a drag this layer to top.Step 6:
Now hold press alter the key and create a negative mask. Now select the brush tool and make sure your foreground color is white. and now easily click and drag on your hair outside area and get your real hair.After complete your hair details. Then select your top of the layer and hold press ALT+CTRL+SHIFT+E for the apply the current image. Now use color lookup filters for a more effective color.
See The Working Screenshot Below:
Thanks for watching this tutorial. I hope you like this tutorial. please like, comment, and share my videos. and subscribe to Us for more update videos. Thank you! see you next Tutorial.
See Another Related Post:
How to Outdoor Portrait Blur Background Photo EditingBlur Photo Background and Green Effects
CLICK THE DOWNLOAD BUTTON FOR FREE
- Model image Credit: Get it
- Top 10 color lookup presets Free download
Video Tutorial:
“Be Creative, Be Success”
Photoshopfree.net
Thank You For Visiting.
Photoshopfree.net
Thank You For Visiting.


Generics4u Cialis Generic Cash On Delivery Pyridium Real Pharmacy buy cialis online using paypal Kamagra Par Internet
ReplyDeletePost a Comment